I put this together because I know how a tiny bathroom can feel crowded and chaotic. You want a space that breathes, not a drawer full of chaos. When the counters are crowded and the shower shelves glare back, a small change can make a big difference. Why I made this is simple: I want you to feel calm when you step into the room.
Who it’s for: If you’re a renter with limited storage, a student sharing a bathroom, or a busy parent, this post is for you. You care about clean lines, easy access, and a space that supports your day, not adds stress.
What you’ll get: 25 small bathroom organization hacks that actually work in real homes. These ideas are budget-friendly, practical, and easy to try in an afternoon. From vertical storage to door organizers and clever bins, you’ll find space-saving solutions that fit tight spaces and busy routines.
And yes, you won’t believe #12. It uses a simple item in a new way to double your storage without big changes. Picture a towel bar becoming a tiny spice rack or a tension rod turning into a second shelf.
These hacks are built for real life. No heavy tools or costly remodels. Start small by picking one corner to test. Add a shelf riser in a cabinet, swap in clear bins, or hang a slim over-the-door rack for towels and brushes. Each idea is described plainly so you can grab it and run.
Ready to get started? Measure your space, pick two ideas to try this week, and see how much you reclaim. You’ll feel the relief as clutter drops and your routine speeds up. This post gives practical, proven steps that help you maximize your space and keep your bathroom neat all week.
Contents
- 1. Go Vertical with Shelving
- 2. Smart Use of Towel Racks
- 3. Clear Storage Containers
- 4. Utilize the Inside of Cabinet Doors
- 5. A Cart for Mobile Storage
- 6. Under-Sink Solutions
- 7. Use Hooks for Jewelry and Accessories
- 8. Hanging Organizers for Small Items
- 9. Decorative Baskets for Style and Storage
- 10. Use a Shower Caddy
- 11. Color-Code Your Storage
- 12. Over-the-Door Organizers for Maximum Storage
- 13. Magnetic Spice Rack for Small Spaces
- 14. Repurposed Items for Unique Storage
- 15. Stylish Shower Curtain Rod Storage
- 16. Bathroom Ladder Shelf
- 17. Use a Bathroom Stool for Display & Storage
- 18. Drawer Dividers for Easy Organization
- 19. Compact Vanity Storage
- 20. Decorative Trays for Countertops
- 21. Utilize Above the Toilet Space
- 22. Create a Cleaning Supply Station
- 23. Use Shower Hooks for Extra Storage
- 24. Seasonal Storage
- 25. Invest in Multipurpose Furniture
1. Go Vertical with Shelving

You feel the squeeze in a small bathroom. There is no room to spread out a pile of toiletries. Vertical shelves can fix that. By growing storage up, you gain space for towels, brushes, and daily items without crowding the floor. Floating shelves above the toilet or near the sink put daily items within easy reach.
Tips for vertical shelving:
– Choose lightweight materials like thin wood, metal, or acrylic. Easy to mount and less likely to sag.
– Use baskets or fabric bins on the shelves. They hide clutter and keep items contained.
– Color-code or group items by use. One color for daily items, another for extra supplies.
Floating shelves turn a bare wall into a slim, useful display. They let you show a small plant, a pretty jar, or a favorite mug, while keeping your essentials close at hand.
– Materials and sizing
What to look for: Choose depth around 6 to 8 inches. Measure wall space first. If space is tight, opt for 12-inch long shelves that run along the wall instead of one long unit.
– Placement ideas
Place shelves directly above the toilet to use dead space. Install a pair at sink height for daily items like toothpaste, brushes, and soap. A tall, narrow shelf can fit in the corner near the tub for towels or extra toilet paper.
– Installation basics
Mark where the studs are if you can. Use wall anchors if you can’t reach a stud. Level the shelves before you tighten screws. Use screws that match the wall and shelf material.
– Styling and safety
Keep heavy bottles toward the center so the shelf stays balanced. Put lighter items on the ends. Use one bin for loose items like cotton balls and q-tips. Clean shelves regularly to prevent dust buildup.
A simple setup might be two slim shelves above the toilet, a small basket for towels, and a few labeled jars for cotton swabs and cotton balls. This combo is easy to adjust as your needs change.
– Common questions
How much weight can these hold? With proper anchors into studs, most slim floating shelves carry about 20–30 pounds. Always check the manufacturer’s specs.
– Quick customization ideas
– Try a pair of slim shelves in the same finish above the toilet for symmetry.
– Put a small plant or glass jar on the top shelf to add life to the space.
– Label bins and keep the most used items in front for fast grabs.
Keep this approach in mind as you plan. Vertical shelving can make a tiny bathroom feel bigger and more organized without changing the room’s floor space.
1. Go Vertical with Shelving
Editor’s Choice

upsimples Floating Shelves for Wall, Wall Shelves for Decor Storage Set …

Amazon Basics Collapsible Fabric Storage Cube Bins Organizer with Handle…

KURUI Drywall Anchors and Screws Assortment Kit 270PCS, 135 Plastic Dry …
2. Smart Use of Towel Racks

Struggling to keep towels off the sink in a compact bathroom? You’re not alone. A smart towel rack can transform a crowded space. It uses vertical room and keeps towels dry and ready at hand. With the right setup, you’ll feel the difference every day.
Benefits of a multi-tier towel rack:
– Frees up counter space by stacking towels cleanly.
– Lets you hang different items on separate levels for quick access.
– Adds vertical depth to your bathroom, giving it a neater look.
A multi-tier rack isn’t just about towels. Each tier acts like a small shelf for folded washcloths, small towels, or a few accessories. The side hooks offer extra spots for brushes, loofahs, or a robe. And the top bar can hold a travel bag or a bathrobe that you want close by but off the counter.
Choosing and placing your rack
– Pick a material that fits your bathroom. Stainless steel or brushed nickel resist humidity well. Matte black adds a modern vibe. If you prefer warmth, a wood or wood-trimmed rack can blend with a cozy look.
– Aim for three tiers if you have decent vertical space. Two tiers can work in tighter rooms, but three gives you more room to separate items.
– Check its width and depth. You want a rack that fits between walls or above a toilet without crowding the door.
Smart placement tips
– Mount at a comfortable height for you—usually around 42 to 50 inches from the floor. That lets towels hang without touching the floor or getting in the way.
– Install where you dry off after a shower or near the sink. Close by means you’ll grab towels faster.
– Use the side hooks for everyday items like a hand towel, scrub brush, or a small bag. The top bar is great for a robe or a spare towel you want handy but off the counter.
Staying practical and tidy
– Don’t overload a single tier. Even with three levels, heavy towels on top can tip the rack and feel awkward.
– Keep the rack clean. Wipe down weekly with a mild cleaner to avoid rust spots or water stains.
– Match the rack to your color scheme. If your fixtures are chrome, go with chrome or brushed finishes. If your room uses warm tones, a brass accent can work—just keep the hardware cohesive.
Limitations to know
– A tall rack can feel bulky in a tiny bath. If your space is very small, consider a compact or narrow model that leans or mounts flat to the wall.
– Heavy items should stay distributed across levels. Don’t pile a heavy bathrobe on the top bar.
With the right towel rack, your small bathroom gains organization, quicker towel drying, and a cleaner look. It’s a simple swap that makes daily routines smoother and space feel bigger.
2. Smart Use of Towel Racks
Editor’s Choice

3 Tier Towel Racks for Bathroom Wall Mounted, 24 inch Bathroom Shelf wit…

Kruodop Towel Hooks for Bathroom,2 Packs Wall Mount Towel Holder,Black M…

keomaisyto 3-Tier Narrow Bathroom Shelves with Drawer, Bathroom Organize…
3. Clear Storage Containers

Small bathrooms feel tight, but you can get more from every inch. Clear storage containers help you see what you have and grab it fast. They stack neatly and fit in cabinets or on shelves without sticking out. Use them for items from first aid supplies to makeup and hair care.
Advantages of clear containers:
– Easy visibility means less time searching.
– They come in various sizes to fit all spaces.
– Helps maintain a tidy look and avoids clutter spills.
Labels can boost order, too. Keep them simple and put them where you can read them at a glance.
Labeling tips:
– Keep labels minimal and bold.
– Use a dry-erase label for items you move often.
– Put the label on the front edge so you can read it without moving the container.
How to pick and set them up:
– Start with a basic set of 6–8 containers in different heights and widths.
– Choose stackable designs with matching lids for a clean line.
– Look for clear plastic or glass that lasts in a humid bathroom. If you store personal items, pick options that are BPA-free.
– Maintain the system by keeping lids attached to bases when you stack.
Practical placement ideas:
– Store in a tall cabinet above the sink for daily items.
– Line shelves with a few flat containers to create open space in the middle.
– Use under-sink organizers if you have a plumbing box; add a slim bin for smaller items.
Care and upkeep:
– Wash containers with mild soap and warm water.
– Dry them completely before stacking to stop mildew.
– Rotate items every few months to keep things fresh and easy to reach.
Common questions you might have:
– Are clear containers better than opaque ones? They help you spot items quickly, which saves time.
– Can I use them in the shower? Choose clear plastic or glass that resists moisture.
– How do I prevent labels from peeling? Use a label maker or good, clear tape on a dry-erase label.
With the right clear containers, your bathroom can stay tidy with less effort. You gain visibility, save time, and keep a calm, clean look that makes daily routines smoother.
Start small today and feel the difference. You’ll see your shelves become calm and easy to use.
3. Clear Storage Containers
Editor’s Choice

Vtopmart 6 Pack Clear Stackable Storage Bins with Lids, Large Plastic Co…

Nelko Label Maker Machine with Tape, P21 Bluetooth Label Printer, Wirele…

2 Pack Multi-Purpose Pull-Out Storage Organizers, Under Sink Organizers …
4. Utilize the Inside of Cabinet Doors

Your bathroom needs more space. Shelves fill up, but the inside of cabinet doors stays empty. That wasted space can change how you move through your morning routine. It’s simple to fix and it pays off fast.
Try these door tricks. Each one is easy, quick, and built to last in a humid room. You’ll feel the difference right away.
– Adhesive hooks or small racks: Attach them to the door to hang brushes, combs, hair ties, and tiny cosmetics. This keeps daily-use items in reach and frees shelf space. Clean the door first, press firmly, and let the adhesive cure before loading items.
– Magnetic strips for tiny metal tools: A slim magnetic strip holds tweezers, nail clippers, and small scissors. It keeps metal tools visible and easy to grab. Choose a bathroom-grade strip that resists moisture and won’t rust.
– A slim caddy for deodorant and perfume: A door-mounted caddy fits deodorant sticks, travel sprays, and perfume bottles. It keeps tall items from tipping over on the shelf. Look for a curved lip or shallow well to cradle tall bottles securely.
– Pocket organizers for compact storage: A fabric or vinyl pocket organizer attaches with clips or adhesive. Clear pockets let you see what’s inside. Use it for cotton swabs, bandages, lipstick, and travel-size lotions. It keeps loose items grouped and easy to locate.
Smart setup tips. Use bathroom-safe adhesives made to handle humidity. Start light and add weight gradually. Place items by how often you use them—daily items on top, rarely used ones lower down. If your bathroom is damp, wipe the door occasionally to keep adhesives strong.
What to know before you start. Not every item belongs on the door. Avoid heavy bottles that strain the hinges. Use this method mainly for small tools, cosmetics, and travel-size products. For heavier needs, keep them on sturdy shelves.
A quick installation plan. Clean and dry the door completely. Mark where each organizer will sit. Attach using the method you chose and press firmly. Let adhesives cure as directed, then test by gently tugging on items. If something slips, switch to a stronger solution or move it to a shelf.
With these ideas, the inside of cabinet doors finally helps you organize. The space feels calmer, and finding what you need is faster. Your bathroom becomes easier to use every day.
Unlock hidden potential in your small bathroom! The inside of cabinet doors can be a game-changer for organization, turning wasted space into a haven for your essentials.
5. A Cart for Mobile Storage

Your bathroom is small, and clutter steals space. A rolling cart can change that. It moves where you need it and stores what you use most.
Benefits of a rolling cart:
– Keeps essentials at hand, even in tight spots.
– You choose a finish or color that matches your vibe and decor.
– Wheels let you move it for cleaning, guests, or a quick tidy-up.
Pick a cart that fits your look and your space. Let it shoulder the storage load so you don’t feel crowded.
How to pick the right cart
– Size matters: measure your space and door clearance. A cart that’s too big will feel crowded.
– Material choice: plastic holds up in damp rooms, metal lasts longer, bamboo adds warmth. Pick what fits your bath’s humidity and style.
– Shelves and baskets: aim for two or more levels. Include a small bin or tray for tiny items.
– Wheels and feet: lockable wheels give safety, smooth rollers make moving easy. A bump-free cart is a joy to use.
– Height and reach: top shelf should be comfortable to reach while standing. If you share the space, consider a cart with adjustable shelves.
Practical setups you can use
– Top shelf: towels, a soap tray, daily skincare items.
– Middle shelves: daily toiletries, toothbrushes, toothpaste, and meds in a small container.
– Bottom: cleaners, extra toilet paper, or a folded bath mat. Keep heavy items on the bottom for balance.
Placement ideas
– Put the cart beside the sink so you grab what you need without stepping away.
– Tuck it in a corner near the shower. It stays out of the way but is still easy to reach.
– If you have a narrow vanity, slide the cart under a counter when you don’t need it.
Maintenance and styling tips
– Wipe spills right away to avoid stains. A quick wipe keeps it fresh.
– Use a liner or non-slip mat on shelves to prevent items from sliding.
– Add a couple of decorative baskets for small items. They hide clutter while staying handy.
– When you’re not using it, store the cart in a closet or behind a door to free up space.
With these steps, you gain real space without losing access. A rolling cart is a practical upgrade for any small bathroom, blending function with style and making daily routines smoother.
5. A Cart for Mobile Storage
Editor’s Choice

Sywhitta 3-Tier Plastic Rolling Utility Cart with Handle, Multi-Function…
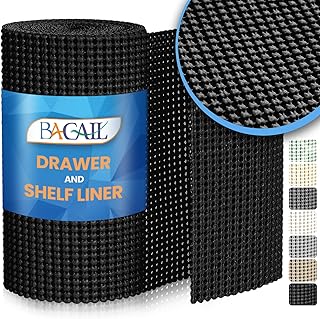
BAGAIL Drawer and Shelf Liner, 12 in X 10 Ft Non-Adhesive Shelf Liners f…

OIAHOMY Large Blanket Basket, 22”x17”x12” Rectangle Woven Baskets, Nurse…
6. Under-Sink Solutions

The space under your sink is easy to ignore, yet it hides real storage potential. It can store more than you think when you arrange it right. These under-sink storage ideas boost bathroom organization and cut clutter. The goal is to keep the area clean, visible, and easy to use every day.
Tips for under-sink organization:
– Choose a mix of clear, stackable bins for small items and taller containers for sprays and bottles, so you can see everything at a glance.
– Create simple zones by grouping cleaners at the back, toiletries in the middle, and spare towels toward the side, so you reach the right item in seconds.
– Place frequently used items toward the front to cut hunt time during busy mornings and keep daily routines flowing smoothly.
– Install a slim tension rod under the shelf to hang spray bottles, freeing shelf space and preventing bottles from tipping into clutter.
– Add a pull-out tray or slim metal rack to corral tall bottles and cleaning tools without moving other items.
– Use a small basket for grab-and-go items like wipes, spare sponges, or extra soaps so they stay together.
– Label each bin with a simple tag or tape so anyone in your home can find what they need fast.
– Line the cabinet with a moisture-resistant mat or liner to protect bins, reduce rust, and keep things dry in damp spaces.
– Choose transparent bins and labels so contents are easy to spot at a glance, which saves time and cuts mess.
– Measure your cabinet depth, door swing, and plumbing clearances before buying so you don’t waste money on ill-fitting organizers.
– If space is tight, mount a door rack or pocket organizer on the inside of the cabinet door for extra pockets.
– Keep a simple cleaning caddy with your most-used products close at hand to speed up routine tasks.
With these tweaks, your under-sink area becomes a calm, functional station you actually enjoy using. Take small steps today, measure what you have, and start with one or two organizers. Small changes add up fast, and a tidy under-sink setup lasts. Start today with one tidy bin and watch the difference grow.
6. Under-Sink Solutions
Editor’s Choice
Vtopmart 6 Pack Clear Stackable Storage Bins with Lids, Large Plastic Co…

Under Sink Organizer, 2 Packs 2 Tier Under Sink Organizers and Storage, …

Premium Heavy Duty Remote Trigger Sprayer, 40” Extended Reach Hose White…
7. Use Hooks for Jewelry and Accessories

Struggling to keep small bathroom items from disappearing into the shadows of the sink? A simple hook setup can change everything. By giving jewelry, hair accessories, and tiny bags a home, you gain quick access and less clutter. It’s fast to install, inexpensive, and helps your space feel calmer.
Why hooks are great:
– They make items easy to reach and see at a glance.
– They add a little style to your bathroom wall.
– They stop small pieces from piling up on counters and shelves.
Hooks work for more than just keys. They’re perfect for earrings, hair ties, bracelets, and even travel-sized bags you grab on your way out the door.
Where to put your hook system
– Wall-mounted hook boards are common and tidy. Put them near the vanity so you can grab what you need while you get ready.
– The back of the door is a handy spot if you’re short on wall space. An over-the-door rack can hold many items without drilling.
– Peg rails give you flexibility. You can move hooks around as your collection changes.
– Magnetic strips can hold metal pieces, like certain necklaces or metal barrettes, if humidity isn’t a problem in your bathroom.
– Choose materials that stand up to moisture. Stainless steel, powder-coated metal, or solid wood with a water-resistant finish last longer in a humid room.
Choosing the right setup and hooks
– Look for moisture-resistant finishes and rust-free hardware. You don’t want corners that corrode after a few showers.
– Pick a style that matches your bathroom. A sleek metal rail feels modern; a wood board adds warmth.
– Decide how many items you want to hang. A small board works for a few necklaces, while a larger rail handles many hair accessories.
How to install in simple steps
1. Pick a spot that’s convenient for daily use and out of direct spray from the shower.
2. Measure the space and mark where screws or adhesive strips will go.
3. If you’re drilling, use a level so the board sits straight. If you rent, use sturdy adhesive hooks or an over-the-door solution.
4. Attach the board or rail securely to the wall or door.
5. Hang items and test the setup with a light pull to ensure it’s stable.
Organizing tips that actually work
– Group items by type: jewelry on one section, hair accessories on another, small bags on a third. This makes things fast to find.
– Use a mix of hook types. Short hooks for clips, longer hooks for necklaces, and small pegs for bracelets.
– Color-code or label sections to keep a routine. For example, silver tones near the sink, gold tones a bit farther away.
– Leave a tiny tray or dish for items you wear every day so nothing gets misplaced.
Maintenance and care
– Wipe metal hooks with a damp cloth to remove soap residue. Dry them to prevent rust.
– Check that screws stay tight every few months. If you see wobble, tighten and re-secure.
– Reorganize as your collection grows or changes with the seasons.
A quick-start plan
– Start with a small wall board near your mirror.
– Add a few versatile hooks for daily items.
– Expand gradually as you discover what items tend to go missing.
With this approach, your bathroom stays neat, and you won’t lose track of tiny accessories again.
7. Use Hooks for Jewelry and Accessories
Editor’s Choice

GlazieVault Coat Hooks Wall Mounted – MDF Board Nickel Hook Coat Rack(2 …

Over The Door Hooks, Door Hanger Hooks for Hanging, Over The Doors Towel…

SWANLAKE 12″ Magnetic Tool Holder Strip,Metal Tool Magnet Bar for Garage…
8. Hanging Organizers for Small Items

If you have a small bathroom, every inch counts. Tiny items spill out of drawers and sit on the counter. Hanging organizers can fix that without stealing space you don’t have. You can mount them on a door or on a wall. They turn vertical space into real storage.
Benefits of hanging organizers:
– They free shelf space and keep items easy to reach.
– They add style while staying functional.
– They install quickly and come off without a mess.
– They come in many colors and designs, so you can match your vibe.
Hanging organizers work best when you use them for small items. Think hair products, daily toiletries, travel-size bottles, or cleaning supplies. The pockets hold grab-and-go items, so you spend less time digging. You’ll notice a calmer counter and a neater vanity in minutes.
Choosing the right organizer is simple. Start with size. Measure the door or wall area you plan to use. Pick a model that fits without blocking handles or the sink. Material matters, too. Fabric options feel soft and light and can be washed. Plastic or vinyl pockets are easy to wipe clean. Clear pockets let you see what’s inside at a glance. Mesh styles breathe and drain if you spill liquids. If you splash-proof your space, choose sturdy plastic with strong seams.
Color and design matter, but so does fit. If your bathroom is bright, a bold color can pop. If it’s calm, go for a neutral shade that blends in. Look for multiple pocket sizes. Tiny pockets are great for bobby pins and razors. Larger pockets hold brushes, bottles, or jars. A few transparent pockets help you spot items fast.
Placement matters. The back of the door is perfect for towels, brushes, and sprays. Wall-mounted units stay out of the way and keep things within reach. Avoid placing organizers where they block air flow or light. Install with simple screws or over-the-door hooks. Most setups won’t require tools. In minutes, you can have a tidy system ready to go.
Smart setup tips you can use today:
– Group similar items together. Hair care with hair items, skin care with skin items.
– Keep daily items in the most accessible pocket. Put backups in a higher pocket.
– Label pockets if you switch items often. A small tag helps you remember what’s inside.
– Clean the fabric or wipe the plastic every week. Quick care keeps it looking fresh.
Common questions:
– Will these hold heavy bottles? Choose models with strong seams and wide straps. If in doubt, use larger pockets for heavy items.
– Can I remove and rehang them? Yes. Most options come off with no damage.
Real-life examples:
– A door organizer stores shampoo, conditioner, and shaving cream in one place.
– A wall unit holds cotton swabs, bandages, and travel bottles in easy reach.
– A clear pocket system shows toothbrushes, toothpaste, and floss at a glance.
Bottom line: hanging organizers are a practical, affordable way to reclaim space. They’re flexible, easy to install, and simple to use every day. Your small bathroom can feel bigger and more organized starting now.
8. Hanging Organizers for Small Items
Editor’s Choice

AOODA 2 Pack Over the Door Organizer, Large Capacity Closet Door Hanging…
![4 Set [EXTRA LARGE] Hanging Wall Mount Storage Baskets with Adhesive Hoo...](https://m.media-amazon.com/images/I/812qykSTCXL._AC_UL320_.jpg)
4 Set [EXTRA LARGE] Hanging Wall Mount Storage Baskets with Adhesive Hoo…

2 Pack 36 Pockets Classroom Pocket Chart for Cell Phone Calculator Holde…
9. Decorative Baskets for Style and Storage

Feeling a bit overwhelmed with bathroom clutter? Decorative baskets can fix that. They add style and hide mess at the same time. You get calm space and quick access, all in one.
Why choose baskets?
– They fit many decors, from bright and airy to warm and earthy.
– They’re light and easy to move when you need a clear surface.
– They hide everyday stuff like towels, toiletries, and skincare, keeping counters clean.
Mix and match different sizes and textures. A layered setup looks dynamic and still serves a purpose. You’ll see the shelves come alive with depth, not dust.
How to use baskets in real life
– Roll towels and stack them in a tall woven basket near the shower. It looks neat and you’ll grab towels fast.
– Place backup toiletries in a shallow basket on a shelf. Labels or a simple tag keep items easy to find.
– Put small skincare products in one fabric basket inside a larger basket. It cuts clutter and makes weekly routines faster.
– Use a big basket on the floor for extra toilet paper or bath mats. If space is tight, it slides out of the way when guests visit.
Choosing the right basket for your bathroom
– Pick moisture-friendly materials. Woven options like rattan, water hyacinth, or a plastic-coated wicker resist damp air.
– Consider finishes. Natural tones bring warmth; painted options add a pop of color; smooth lacquered looks feel sleek.
– Size matters. Measure shelves, sinks, and corners before buying. A basket that’s too big crowds the view; one that’s too small leaves items exposed.
– Think liners. A simple liner keeps cosmetics and small items contained and easier to wipe clean.
Placement ideas that maximize space
– Group two or three baskets on open shelves for a tidy display and quick access.
– Use a basket under the sink as a hidden drawer for cleaning supplies or extra toilet paper.
– Put a low basket next to the vanity for daily-use items like toothpaste, toothbrushes, and brushes.
– Place a decorative basket by the tub or shower to hold washcloths or bath sponges.
Care and upkeep tips
– Wipe baskets with a damp cloth weekly. Dry them completely to prevent mold.
– Rotate items seasonally so you don’t carry products you won’t use.
– Lift and move baskets instead of dragging them across the floor. It protects both the basket and the surface.
Fast trends that actually help
– Combo sets: small, medium, and large baskets create a layered look that’s easy to maintain.
– Natural textures with a modern twist keep bathrooms feeling fresh.
– Neutral tones with a single bold basket as an accent to draw the eye.
With the right baskets, your bathroom becomes both prettier and more practical. You’ll notice the space feels bigger, cleaner, and easier to keep that way every day.
9. Decorative Baskets for Style and Storage
Editor’s Choice

Storage Baskets for Organizing, Woven Decorative Baskets for Shelves – B…

Plastic Wicker Storage Baskets – Toilet Tank & Bathroom Baskets, Woven f…

Yunkeeeper storage bins Cubes, Fabric Cube Organizer with Handle, Foldab…
10. Use a Shower Caddy

If your shower feels crowded with bottles, a simple caddy can fix it. It keeps essentials in reach and clears the floor. You’ll feel the difference every time you step inside.
Why a shower caddy makes sense
– It stops bottles from piling up on the shower floor. Less clutter means fewer slips.
– You can grab soap, shampoo, and conditioner without reaching into a spray zone.
– It’s easy to move for a quick clean of the shower walls.
– You’ll see what you have at a glance, so you won’t forget refills or deals on new products.
– It cuts down on water drips around the tub or stall, keeping the area a touch drier.
Choosing the right caddy
Think about how your bathroom looks and how you use it. The right caddy blends style with fit.
– Materials: Look for rust-proof options like stainless steel or durable plastic. Bamboo feels warm but needs a dry spot to avoid warping.
– Types: Hanging caddies on a shower rod, wall-mounted units, corner caddies for tight spaces, or over-the-showerhead shelves. If you rent, a no-drill option is worth a try.
– Size and weight: Pick a model with enough shelves for your daily items but not so large it crowds the shower. Heavy bottles should be kept on sturdy shelves.
– Installation: Suction cups work on smooth tiles, but tension rods and wall mounts are stronger in busy showers. Follow the maker’s instructions and test with a light load first.
– Style: Match fixtures and hardware—polished chrome, matte black, or white plastic all work with modern, rustic, or minimal bathrooms.
Placement and setup tips
Measure the space before you buy. Place the caddy where you can reach it without bending or twisting. Keep it away from the direct spray so items don’t loosen.
Steps to set up:
– Clean the wall or rod area; dry it completely.
– Attach the caddy firmly, then test its weight with a few bottles.
– Adjust height if you can reach everything easily while standing straight.
Smart usage tips
– Group items by type: hair care on one shelf, body wash on another, razors in a small basket.
– Use small, removable bins for travel sizes—great for guests or gym trips.
– If space is tight, choose a compact hanging caddy with two shelves and a hook for a washcloth.
Maintenance and honest limits
Wipe the caddy weekly to prevent soap scum and rust spots. Dry after showers to keep metal parts shining. If your shower is very small or uneven, a caddy may feel crowded; in that case, add a slim wall shelf or corner unit instead.
Common questions you might have
– Will it rust? Choose rust-resistant metal or sturdy plastic; check coatings regularly.
– Are suction cups strong enough? They work well on clean, smooth tiles. Re-check after a few weeks.
– How do I clean it? Rinse shelves, wipe with a dry cloth, and remove items for a quick scrub every so often.
With the right shower caddy, your space feels bigger, cleaner, and easier to use. It’s a small change that pays off day after day.
10. Use a Shower Caddy
Editor’s Choice

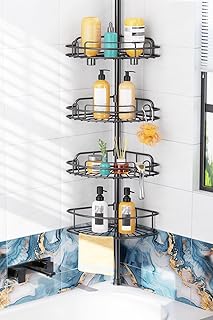
HAMITOR Corner Shower Caddy Tension Pole: 4-Tier Rust-Resistant Adjustab…

YASONIC Shower Caddy Adhesive, No Drill Bathroom Shower Organizers, with…
HAMITOR Shower Caddy Tension Pole: 4-Tier Rustproof Bathroom Corner Shel…
You might also like

11. Color-Code Your Storage

Color-code your storage to fix clutter and cut down on search time. In a small bathroom, color acts like a shortcut for your brain. You’ll grab what you need without digging through a heap of bottles. Plus, you get a cleaner look that still feels calm.
How to set up color-coded storage in your bathroom
– Step 1: Pick a simple color map. Choose 4 colors that go with your decor. For example, blue for skincare, green for hair care, white for cleaners, and gray for tools. Keep it steady—this makes every item easy to find.
– Step 2: Choose containers that show the color well. Use colored bins, baskets, or lids that match your map. Clear bins with colored lids work great because you can see contents while still getting the color cue.
– Step 3: Group items by color zones. Put all skincare in the blue bin, all hair products in green, cleaners in white, and tools in gray. Put the bins within easy reach of your sink or shower so you won’t stretch or bend too much.
– Step 4: Label each bin with both color and text. A small sticker or card that says “Skincare” makes it clear. You’ll thank yourself later when you’re in a hurry.
– Step 5: Keep a visual system tidy. When you add new products, match them to the right color zone. If you run out, swap items into the correct bin so the system stays clean.
Why color-coding works
– Advantages of color-coding: It helps you find items fast when you’re in a rush.
– It adds a playful touch that can blend with your bathroom style.
– It reduces clutter because each item has a home you can see at a glance.
Practical tips to keep it working
– Use sturdy, moisture-resistant containers. Bathrooms are humid, so pick plastics that won’t warp or stain.
– Keep the most-used colors at eye level. That makes grabbing the right bin feel quick and natural.
– Refresh the system as your kit changes. If you add a new color or a new category, expand the map rather than letting things mound up.
– Pair color with simple labels. Even faint text helps you confirm the category, saving seconds and confusion.
Make color-coded storage your default routine. It blends function with style, helps you stay organized, and gives your bathroom a cleaner, more intentional look. With a small setup, you gain calm, quick access, and a space that actually reflects how you use it.
11. Color-Code Your Storage
Editor’s Choice

8 Pack Colorful Storage Bins with Lids Stackable Storage Container for O…

CATIFLIN 1200 Blank Removable Freezer Labels, Waterproof & Oil Resistant…

Storex Small Cubby Bins – Plastic Storage Containers for Classroom with …
12. Over-the-Door Organizers for Maximum Storage

Struggling to keep a small bathroom tidy? Your door can become a hidden storage spot that actually works for you. An over-the-door organizer sits right where you need it, without taking up counter space. It turns wasted door area into quick-access storage for daily items and long-used supplies.
Key Benefits:
– Free up counters and floors by tucking items into organized pockets.
– Simple to install and easy to rearrange as your needs change.
– Comes in many materials and looks, so you can match your style from minimalist to bold.
With so many options, you’ll find one that fits your personality and boosts function without clutter.
Choosing the right over-the-door organizer is about three things: how you plan to use it, what your door can handle, and how it looks in your bathroom.
– Material matters: Fabric pockets are soft and quiet, plastic pockets are clear and see-through, metal and wire options are sturdy and easy to wipe. If you have moisture, pick materials that dry quickly and resist mold.
– Pocket design: Look for wide pockets for bigger items like toothpaste and lotion, plus smaller sections for razors, brushes, cotton swabs, and makeup. A mix of deep and shallow pockets helps you see and grab what you need fast.
– Size and fit: Measure your door width and the space above the top of the door. Choose a model that won’t block the door handle or light switch. If your door swings inward, pick a low-profile organizer so it doesn’t get in the way.
How to set it up for real use
– Clear the door area first. Wipe the frame so it sticks cleanly and won’t slide.
– Decide a daily zone. Put toothpaste, toothbrushes, and soap in the top pockets. Put backups like extra toothpaste tubes in the middle. Reserve the bottom for brushes, razors, and larger items.
– Keep one pocket for cleaning supplies or towels. A small lint roller or wipes find a home there.
– Label items or group by task. Seeing “face” near skin care or “soap” near the sink helps you grab fast.
– Try a glass-clear pocket for tiny items like floss picks or bobby pins. Visibility makes a quick grab obvious.
Installation tips that last
– Use removable hooks or over-the-door kits designed for bathroom humidity.
– If your door is thin, line the top edge with a small pad to protect the door and reduce slipping.
– Check weight limits. Don’t overload a single pocket; distribute weight evenly to prevent sagging.
Limitations and care
– Some pockets may snag when opening doors quickly. If that happens, switch to smoother fabrics or shallower pockets.
– Wipe down weekly to prevent mold and soap residue. Let any damp fabric dry fully before hanging again.
Over-the-door organizers are a practical, stylish way to create order in a small bathroom. They offer fast wins—clear counters, quick access, and a clean look—that you can customize as your routine changes.
Transform your small bathroom with an over-the-door organizer! It’s the hidden gem that turns clutter into convenience, freeing up your counters for a serene space.
12. Over-the-Door Organizers for Maximum Storage
Editor’s Choice

ULG 1 Pack Over Door Organizer with 5 Large Pockets 10 Mesh Side Pockets…

Simple Houseware 24 Pockets – Crystal Clear Over The Door Hanging Shoe O…

Over The Door Organizer, Metal Door Organizer Hanging with 5 Adjustable …
13. Magnetic Spice Rack for Small Spaces

Small bathrooms often feel cramped. A magnetic spice rack can change that. It sticks to a metal wall or a magnetic board and holds small containers for toiletries or makeup. You’ll free up counter space and grab what you need in a flash.
Benefits of a magnetic spice rack:
– Keeps items visible and within reach.
– Saves counter and drawer space.
– Adds a clean, modern touch to your bathroom decor.
Keep things neat by choosing small, clear containers. Clear jars let you see what’s inside at a glance, so you don’t hunt for products.
What you’ll need
– Small, clear containers with magnetic bases or lids.
– A steel strip, magnetic board, or a metal-backed panel.
– Mounting hardware (screws) or extra-strong adhesive for walls.
– Labels or tape to mark contents.
– Optional: a tiny microfiber cloth for quick wipe-downs.
How to set it up
1) Pick a spot near the sink or mirror. A height that’s easy to reach matters.
2) Make sure the wall surface is magnetic. If not, install a thin magnetic board on tile or paint, or attach a metal strip to a stud.
3) Attach the steel strip or board securely using screws or strong adhesive.
4) Fill the containers with your toiletries or makeup. Label each jar so you can tell them apart fast.
5) Place jars on the rack, keeping frequently used items at eye level for quick grabs.
6) Test the setup. If a jar slips, swap to a stronger magnet or a smaller container.
Smart tips for best results
– Use several small, clear jars instead of one big bottle. They’re lighter and easier to swap.
– Color-code lids or rims to match your bathroom palette.
– Keep moisture-prone items in sealed jars to reduce dampness on surfaces.
– Clean the rack weekly with a quick wipe to prevent buildup.
– Add a few extra magnets if you plan to store heavier items.
Common questions
Q: Can I use this in a rental?
A: Yes, with removable strips or adhesive that won’t peel paint. If you must drill, use a small, unobtrusive anchor and patch later.
Q: Will humidity mess with the magnets?
A: Some magnets can lose grip in damp air. Choose strong, rust-resistant magnets and lightweight containers.
Limitations and alternatives
– It won’t hold heavy bottles or large items. Use a separate shelf for those.
– If the wall isn’t magnetic, add a slim magnetic board or a metal-backed panel to create a surface you can mount jars on.
– For renters, consider temporary adhesive strips or magnetic tins that cling to a painted metal sheet you can remove later.
This setup keeps your bathroom tidy and practical. It’s simple to install, easy to reorganize, and surprisingly stylish. Give it a try, and you’ll notice the room feels bigger the moment you step in.
Small bathrooms don’t have to feel cramped! A magnetic spice rack keeps your essentials visible and saves precious counter space—making your morning routine a breeze!
13. Magnetic Spice Rack for Small Spaces
Editor’s Choice

Metal 4 Pack Magnetic Spice Storage Rack Organizer for Refrigerator and …
2Pack Black Magnetic Board,17.5″ x 11.4″ Magnet Bulletin Board to Displa…
14. Repurposed Items for Unique Storage

Repurposed Items for Unique Storage
If your small bathroom feels crowded, you’re not imagining the problem. You need space that works. The simplest fix often sits right in your home. Repurposing items you already own can add charm and clear clutter. It’s budget-friendly and practical. You’ll see space open up, fast.
– Use an old ladder as a towel rack. Lean it against the wall or mount it with brackets. Hang towels and robes easy. Add a few hooks for washcloths if you want extra spots.
– Turn a wine crate into a towel and linen keeper. Stand it on the floor or mount it on a wall. Roll towels and tuck them into the cubbies. Stain or paint it to match your bath style.
– An old shelf can hold baskets and jars for extra toiletries. Place it at a comfortable height. Put small baskets on each shelf for hair products, soaps, and creams.
– Decor boxes become hidden storage. Put lids on top to hide clutter. Use the inside for small items like spare toothpaste, floss, and mini soaps.
– Reused jars are tiny storage heroes. Label them with a marker. Fill with cotton balls, swabs, q-tips, or bath salts. Line them on a tray or shelf for a calm look.
– A hanging shoe organizer on the back of a door or inside a cabinet becomes extra shelves. Clear pockets hold brushes, razors, makeup, and travel bottles. You’ll see what you need at a glance.
– A small wire rack from the kitchen or a metal basket fits on a sink ledge or inside a cabinet. Use it for daily items and to cut clutter. Clip or hook items to keep them from tipping.
Smart plan helps you win space fast. First, pick a spot and measure it. Then choose one repurposed item that fits. The goal is simple: more room, less mess.
– Create a quick mood board to guide color and style. Choose natural wood, whitewashed finishes, matte black, or soft gray.
– Label everything. When you know where things belong, you’ll return items there every time.
– Check moisture and wear. Some repurposed pieces aren’t built for damp spaces. Seal wood. Use jars with tight lids. If something wears out, swap it for a purpose-built piece.
With a few tweaks, your bath looks cleaner and feels bigger. You’ll appreciate the extra space—and you’ll notice the difference soon.
14. Repurposed Items for Unique Storage
Editor’s Choice
Simple Houseware 24 Pockets – Crystal Clear Over The Door Hanging Shoe O…
OIAHOMY Large Blanket Basket, 22”x17”x12” Rectangle Woven Baskets, Nurse…

Anchor Hocking Heritage Hill 1 Gallon Glass Jar with Lid, Set of 2
15. Stylish Shower Curtain Rod Storage

Your small bathroom needs breathing room. The shower curtain rod sits in plain sight. You can turn it into extra storage with a few simple moves.
Benefits of rod storage
– Keeps items off the floor and within easy reach.
– Uses vertical space without crowding the room.
– Lets you swap in new hooks or caddies to fit your decor.
– Is cheap and quick to set up.
– Is easy to remove if you need to change the layout.
Best of all, you can do this without drilling or buying big shelves. It fits renters and homeowners alike, and it adapts as needs change.
Small tweaks make a big difference. You can add a pop of color with bright hooks or keep it sleek with brushed metal. Either way, your shower becomes neater and calmer.
Steps to set it up
– Measure the space between the curtain rod and the ceiling to pick a good height for a second rod or hooks.
– Choose a setup. Option A uses a second tension rod above the curtain rod. Option B uses S-hooks on the existing rod.
– Install the rod or hooks.
– Test the setup by gently tugging at the items. Make sure it stays in place.
– Decide what goes where. Place washcloths and brushes on the second rod. Put small bath products in a pocket caddy or basket on the edge.
– Choose materials that won’t rust in a damp bathroom.
What to hang on the rod
– Washcloths on S-hooks for quick drying and easy grabbing.
– Loofahs, bath brushes, and razors on hooks that won’t snag skin.
– A slim, waterproof caddy for shampoo, body wash, and soap bars.
– A tiny rack or pocket organizer for razors, lotion, and extra blades.
– A towel or two if you have space.
Style and care
– Choose rust-resistant metal or sturdy plastic. Match finishes to your faucet or hardware.
– Use color coded hooks to help family members find their items fast.
– Keep baskets lightweight and easy to wipe down. Rinse and dry them weekly.
– Clean the rod and hooks every couple of weeks to prevent mildew.
Limitations to keep in mind
– Heavy products can pull on the rod and loosen the grip.
– Not all bathrooms have wall space for a second rod. You may need a simple set of hooks.
– If the curtain can’t move freely, test the setup before adding heavy items.
15. Stylish Shower Curtain Rod Storage
Editor’s Choice

Black Shower Curtain Rod 31 to 80 Inch,1 Inch Diameter Adjustable Spring…

Navona 12 Pcs S Hooks for Hanging Heavy Duty, 3.5-inch Heavy Duty Metal …

Veken Rustproof & Waterproof Shower Caddy 6-Pack, No Drilling Adhesive S…
16. Bathroom Ladder Shelf

If your small bathroom feels crowded, a ladder shelf can fix it. It uses vertical space and stays slim on the floor. You get extra storage without blocking the room. It’s easy to move if you ever rework the layout.
Benefits of a bathroom ladder shelf:
– Vertical storage that saves precious square feet.
– An inviting, warm look that blends with many styles.
– A perfect spot to display pretty bottles, soaps, or tiny plants.
– Easy access to everyday items, so you don’t hunt for towels or extras.
Place it in a corner to make a practical feature that also looks intentional.
Materials and style to consider
– Wood shelves bring warmth. Think teak, bamboo, or painted pine with a moisture seal.
– Metal ladders stay sleek and modern. Powder-coated finishes resist humidity.
– A mix of wood and metal can blend rustic and contemporary vibes.
– Pick finishes that dent and warp less in damp air. A simple seal or varnish helps.
Where to put it and how to load it
– Choose an inside corner near the sink or toilet for quick access.
– Install against a wall, ideally near studs for strength. If you can’t, use strong wall anchors.
– Top shelves should hold light items first. Reserve heavier bottles for lower rungs.
– Don’t overfill. Keep the look clean and safe by avoiding top-heavy stacks.
Practical ways to style it
– Top shelf: a small plant, a scented candle, or a decorative bottle.
– Middle shelves: rolled towels or small fabric baskets.
– Lower shelves: extra toilet paper or cleaning supplies tucked in a basket.
– Add a non-slip mat at the base if the ladder sits on a tile floor.
Setup and safety tips
– Secure the ladder to the wall with an anti-tip strap if you’re near a high-traffic area.
– Use soft, non-scratch feet to protect your floor and keep the shelf steady.
– Check screws and brackets every few months. Tighten loose parts right away.
– If moisture is a lot in your bath, choose seals and finishes that resist mold and swelling.
Common questions you might have
– Will a ladder shelf fit in a tiny bathroom? Yes, if you pick a narrow unit and measure the corner first.
– Can it hold heavy items? Look for models with reinforced joints and a strong wall mount. Use lighter items on the top and medium weight on the middle.
This ladder shelf is a practical upgrade that adds storage and style. It keeps your bath neat, calm, and easy to use every day.
16. Bathroom Ladder Shelf
Editor’s Choice

Homykic Bamboo Bookshelf 4-Tier Ladder Shelf, 49.2” Freestanding Open Bo…

VASAGLE Ladder Shelf, 5-Tier Bookshelf, Storage Rack, Bookcase with Stee…

Furniture Anchors (10 Pack) Anti Tip Furniture Straps for Baby Proofing,…
17. Use a Bathroom Stool for Display & Storage

If your tiny bath feels crowded, a small stool can become your best helper. It gives you a surface you can see and touch, plus a place to stash items. A stool with a clean line or a warm wood tone can fit many styles, from modern to cottage. It’s not just decoration; it’s a practical tool you’ll reach for every day.
Advantages of using a stool:
– Extra seating when you need a quick sit-down.
– Storage that sits quietly in a corner or beside the vanity.
– Adds a layered, finished look to your bathroom.
Choose a stool that fits your space. Think about how you use the room and pick a size that feels right. The best stools stay sturdy but aren’t hard to move. If you have children or a slippery floor, look for non-slip feet and rounded edges.
How to use it for display
– Make the top a tiny stage. Roll a towel into a neat bundle, place a small plant, and add a pretty soap dish or candle. The mix of textures—a soft towel, a smooth ceramic dish, and a live plant—creates warmth.
– Keep it simple. Use two or three items that share a color or material to avoid clutter.
– Change with the season. Swap in a scented candle for winter, a vase with a fresh bloom in spring, or a minimal sculpture for summer.
How to store with it
– Put a slim basket under the stool seat or on a lower shelf to hide small items like makeup wipes or razors.
– Use the space around the legs for low-profile storage bins or rolled towels stacked in a neat row.
– Group items by use—bath, face, hair—so you grab what you need in one motion.
Materials and styles to consider
– Wood: warm, timeless, and easy to pair with wood vanities.
– Metal: sleek, modern, and sturdy; look for a rust-resistant finish in chrome, brass, or black.
– Rattan or resin: light, easy to wipe clean, and beachy in feel.
– Cushioned tops: a soft touch that also softens a room’s vibe.
Safety and care
– Check stability before every use.
– Wipe down with a damp cloth to remove moisture after showers.
– Protect the finish with a light coat of furniture wax or a bathroom-safe wipe.
Your bathroom stool should feel like a natural part of the room. It stores what you need and shows off small decorative accents. Try a stool you can pull into view when you get ready, then tuck away when guests arrive.
17. Use a Bathroom Stool for Display & Storage
Editor’s Choice

Dreambaby Step Stool for Kids – Non-Slip Base and Contoured Design for T…
Simplify 10 Piece Organizing Set | Multiple Size Bins | Multipurpose | O…

Modern Threads Trefoil Filigree 6-Piece 100% Cotton Towel Set – Reversib…
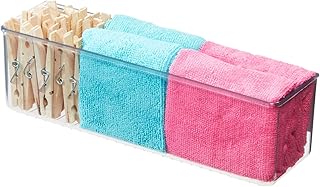
18. Drawer Dividers for Easy Organization

Struggling to keep bathroom drawers tidy? Drawer dividers can turn a cluttered spot into calm, easy-to-use space. You’ll know exactly where to reach for every item.
Benefits of using drawer dividers:
– Keeps everything in its place, so chaos fades away.
– Makes finding items a breeze, since each piece has its own slot.
– Adjustable to fit your drawer and changing needs.
– Protects items from rubbing and bumping as you open and close.
With the right dividers, you gain real breathing room in a small bathroom.
– Adjustable plastic dividers work well in most drawers. They bend to fit odd widths and stay put.
– Expandable bamboo dividers bring a natural look. They handle humidity and add warmth to the space.
– Clear acrylic trays help you see every item at a glance. They’re sturdy and easy to clean.
Materials and care
Choose dividers that resist humidity. Acrylic or coated plastics hold up well in a damp bathroom. If you like wood, opt for sealed bamboo and wipe it down weekly. A thin non-slip liner keeps items from sliding when you open the drawer.
Practical placement ideas
Use the space for small items that tend to vanish. Lipsticks and eyeliners stay upright in slim sections. Cotton pads and swabs fit neatly in shallow troughs. Razors and travel bottles go in wider compartments. Think about your morning routine and place the items you grab first at the front.
Sizing and setup tips
– Measure the inside width, depth, and height of the drawer. Note any curved edges.
– Plan zones for makeup, toothbrushes, and bath products.
– Add a non-slip liner to keep dividers and items in place.
Installation steps
1) Empty the drawer and wipe it clean. 2) Place the dividers where you want each zone. 3) Adjust to snug fits. 4) Return items, spreading weight evenly. 5) Open and close several times to test.
Maintenance and tweaks
Dust regularly and wipe spills quickly. If a section feels loose, reconfigure or swap in a different divider. Change your setup as your routine evolves.
Common questions
– Do I need a drill or screws? Most people succeed with adjustable, no-drill options.
– How can I handle oddly shaped items? Flexible dividers adapt to tougher layouts.
Quick wins to try now
– Create a lipstick and compact area with tall, slim dividers.
– Make a cotton and swab pocket in a shallow tray.
– Reserve a wide space for travel bottles for trips and at-home touch-ups.
18. Drawer Dividers for Easy Organization
Editor’s Choice
Vtopmart 12 Pack Drawer Dividers for Clothes, 4″ High 10.2″-16.6″ Adjust…

4 PCS Drawer Divider, 17″-22″ Adjustable Bamboo Drawer Dividers Organize…

Vtopmart 28 PCS Clear Plastic Drawer Organizers Set, 4-Size Bathroom and…
You Might Also Like

19. Compact Vanity Storage

Your vanity is a hidden gold mine. With the right storage, you gain space, not clutter. Here’s how to make compact vanity storage work for you.
Plan before you buy
Measure the depth, width, and height of each drawer. Note the top surface too. A simple sketch helps you see what fits. Plan around your everyday items so you don’t overfill.
Choose compact organizers
Look for slim, stackable bins that fit inside drawers. Clear acrylic helps you spot products at a glance. Bamboo or metal options add style and durability. Avoid bulky trays that block the whole drawer.
Organize inside the drawers
Use dividers to separate cosmetics, hair products, and skin care. Stack bins to create levels so you can see everything. Place the items you use most often at the front.
Make the top surface useful
Keep just daily essentials on top: toothbrush, toothpaste, a small lotion, a mirror. Use a slim tray or a shallow caddy to gather items. Move rarely used products off the top to the drawer or a cabinet.
Label and maintain simplicity
Label bins or sections so you know where to return items. Do a quick weekly sweep to keep the system tidy. If something doesn’t fit, rethink the layout rather than buy more.
Match materials and style
Pick finishes that match your bathroom: matte plastic for a modern look, glass for a crisp vibe, wood for warmth. The right finish makes the space feel calm, not crowded.
Realistic limits and smart tweaks
Not every vanity has drawers, and not every item fits the same way. When drawers aren’t an option, add slim shelves, or a slim wall-mounted organizer next to the vanity. You can still gain space without buying a full redesign.
This approach yields a calm, easy-to-use vanity. You’ll save time getting ready, and you’ll notice the space look cleaner right away. With a little plan and smart choices, compact vanity storage turns chaos into calm.
Your vanity is a hidden gem! With compact organizers, you can turn clutter into clever storage solutions. Measure, plan, and watch your small bathroom organization transform into a stress-free oasis!
19. Compact Vanity Storage
Editor’s Choice

ClearSpace Clear Plastic Storage Bins – Pantry Organizers & Storage Cont…
4 PCS Drawer Divider, 17″-22″ Adjustable Bamboo Drawer Dividers Organize…

Fixwal Hanging Floating Shelves, 4 Sets of Wall Mounted Shelves for Wall…
20. Decorative Trays for Countertops

Countertops in a bathroom can fill up fast. A single decorative tray helps you give every piece a home. You’ll keep daily essentials within reach and still leave space to move.
Place the tray where you wash up—on the vanity or near the sink. Group items by use: soap, lotion, hand cream, a toothbrush mug, a small plant, a candle, or a decorative pebble. The tray becomes a tiny stage that makes each item easy to grab and put back.
Benefits of using trays:
– Creates visual order on surfaces
– Keeps similar items together for quick use
– Adds a touch of style to your decor
Choose a tray that fits your space without crowding it. Look for a flat base for easy cleaning and rounded edges for safety. Pick a material that cleans well in a damp room and matches your style.
– Materials to consider: ceramic, glass, wood, bamboo, metal, or a mix
– Sizes range from small to large. A small tray holds soap and a tube of lotion. A larger tray can cradle a bottle of sanitizer, a candle, and a plant
– Styles stay popular: modern, rustic, coastal, and minimalist metal
How to use decorative trays effectively:
– Start with one tray in view where you wash hands or brush teeth
– Group items by habit: daily care, fragrances, and décor
– Limit to 4–5 items so the surface doesn’t feel crowded
– Keep it clean by wiping spills as soon as you notice them
– Wash the tray every week or two
Placement ideas that work:
– On the bathroom vanity, under a mirror, with soap, lotion, and a small plant
– On a bathroom shelf, using a longer tray to line up items in a neat row
– By the tub or shower niche, for towels and bath products, as long as the tray resists moisture
Care and maintenance:
– Wipe with a damp cloth, then dry completely
– Use a coaster under any wet item to prevent rings
– If you choose wood, treat it with a sealant to resist water
Common questions:
– Will a tray trap moisture? It can stay tidy if you choose a water-safe material and wipe spills promptly
– How many items should a tray hold? Start with 4–5 daily essentials and add only if space allows
– Can you switch trays seasonally? Yes. A lighter basket in summer and a solid ceramic tray in winter refresh the look
Limitations:
– A tray helps, but a crowded drawer or shelf still needs decluttering
– It won’t replace honest cleaning and daily organization habits
With the right decorative tray, your countertop becomes a calm, easy-to-use space. It makes daily use simple and fast.
20. Decorative Trays for Countertops
Editor’s Choice

Travertine Tray, Small Ceramic Vanity Tray for Bathroom Counter Decor, R…

Bamboo Vanity Bathroom Tray for Counter, Bamboo Tray for Bathroom, Toile…

Hipiwe Industrial Style Metal Iron Tray Galvanized Serving Tray for Coff…
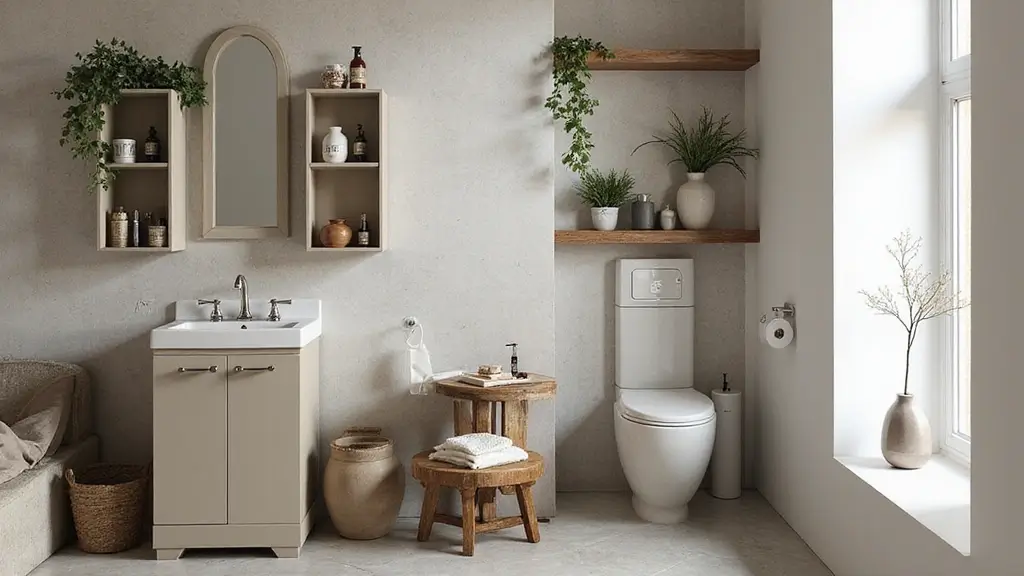
21. Utilize Above the Toilet Space

That blank spot above the toilet wastes space you could use. It doesn’t have to stay empty. A slim shelf, a small cabinet, or a decorative ladder can turn that wall into a handy storage zone. You’ll keep towels, boxes, or even a tiny plant within easy reach. Plus, it adds height and a simple focal point to your bathroom.
Why use this space
– It makes use of area most people skip.
– It brings vertical interest to your room.
– It adds storage without crowding the floor.
Choose items that serve a purpose and look good with your bathroom’s style.
Ways to store up high
– Slim floating shelf across the wall. It holds towels, rolls of TP, or a few decorative boxes.
– A narrow cabinet with doors to hide clutter neatly from sight.
– A decorative ladder to drape towels or display small plants.
– Baskets or bins stacked on a small, sturdy shelf for quick access.
How to install it without a hitch
1) Measure the space. Note the width above the toilet and how high you want the items to sit.
2) Pick a style. Decide between open shelves, a closed cabinet, or a ladder look.
3) Choose moisture-friendly materials. Bamboo, sealed wood, metal, or acrylic work well in damp bathrooms.
4) Secure it properly. Fasten into wall studs when possible. If you can’t hit a stud, use wall anchors rated for bathrooms and heavy items.
Practical setup ideas you can use today
– Roll towels and washcloths in a chic basket so they’re easy to grab.
– Keep extra toilet paper in a slim rack or a decorative bin.
– Add a small plant or a faux plant to bring a fresh touch without extra maintenance.
– Use decorative boxes or organizers for wipes, cotton swabs, and first-aid supplies. Just don’t store medicines in this space; keep them in a medicine cabinet or chest height.
Tips for staying tidy
– Put a lightweight tray on the shelf to corral small items.
– Check the hardware every few months; tighten screws if you hear rattle or feel looseness.
– Dust weekly and wipe surfaces with a quick spray and cloth.
Is it worth the effort? If you want more storage without adding bulky furniture, yes. This space can dramatically improve how clean and organized your bathroom feels. Start small, pick one option, and test what works best for you.
21. Utilize Above the Toilet Space
Editor’s Choice

BAYKA Floating Shelves for Wall, Wall Mounted Rustic Wood Shelves for Ba…

ChooChoo Narrow Bathroom Storage Cabinet with Adjustable Shelves, Tall S…

FUIN 57in Wood Blanket Ladder Living Room Decorative Wall Leaning Farmho…
22. Create a Cleaning Supply Station

Feeling overwhelmed by cleaning gear scattered around the bathroom? You don’t have to be. A dedicated cleaning supply station puts everything in one safe spot, so you can clean faster and with less stress. You’ll see the difference as soon as you open the cabinet or pull up the cart. Everything you need is within reach, and nothing gets in your way.
Why have a cleaning supply station?
– It cuts the time you spend hunting for products.
– It makes cleaning feel smoother because tools are in clear groups.
– It hides clutter while keeping items easy to grab.
A well‑made station helps you stay on task. You’ll know exactly where to find disinfectant, cloths, and brushes every time.
What to include in your station
– Disinfectants and spray bottles in one bin or caddy.
– Rags, microfiber towels, and sponges in another.
– Gloves, scrub brushes, and a small squeegee in a third.
– Paper towels or wipes, trash bags, and spare spare handles or clips.
– Extra tools like a small brush, lint roller, and a spare cloth for quick touch‑ups.
Keep each category in its own container so you can grab what you need without digging.
Best setup and layout
– Pick a housing that fits your space: a slim caddy, a clear bin, or a compact rolling cart.
– Use multiple bins or baskets to separate tasks—one for daily wipes, one for deep cleaning, one for tools.
– Label each bin with simple words so you can see what’s inside at a glance.
– Place the station near the sink or by the bathroom door for easy access when you start or finish a cleaning round.
If you have kids, store cleaners out of reach and consider a small lockable bin. Safety first.
Placement, safety, and routine
– Mount or tuck the station where it won’t tip or spill. Keep liquids capped.
– Choose containers that are easy to wipe down. Plastic bins are forgiving and affordable.
– Do a quick weekly check: recycle old rags, toss expired products, and wipe the interior shelves.
A realistic routine keeps your station useful. For example, use the spray and cloth for quick daily cleans. Reserve a weekly slot for deep scrubbing with brushes and tougher products.
Money and maintenance tips
– Use inexpensive containers you already have, or grab affordable bins at the dollar store.
– Keep a small, reusable label maker or simple tape with a marker for quick labeling.
– Refresh the look with a fresh wipe-down every month; it keeps the space feeling neat.
Step-by-step implementation
– Step 1: Measure your space and choose containers.
– Step 2: Gather items you regularly use and sort them.
– Step 3: Arrange into labeled bins near your sink or door.
– Step 4: Do a quick test clean. Adjust placement if you reach for something and it’s not handy.
– Step 5: Do a monthly check to refresh and reorganize if needed.
With a Cleaning Supply Station, you reclaim time, cut mess, and keep your bathroom tidy and ready for action. Start small, stay consistent, and watch clutter fade away.
22. Create a Cleaning Supply Station
Editor’s Choice

Sterilite 4-Pack Ultra Latching Box, Storage Bins with Lids, Clear Plast…

MaxWorks 80855 500-lb Utility Service PP Cart With Two Trays and Wheels …
Nelko Label Maker Machine with Tape, P21 Bluetooth Label Printer, Wirele…
23. Use Shower Hooks for Extra Storage

Is your shower squeezing every ounce of space from a tiny bathroom? Here’s a simple fix that actually works: use shower hooks for extra storage. They’re cheap, easy, and move with you if you switch layouts later. Hang daily items within reach, and you’ll notice a cleaner counter and a calmer vibe in seconds.
Benefits of shower hooks
– Keeps items off the floor and neatly arranged.
– Lets you grab what you need without rooting through baskets.
– Adds style with different looks—from chrome to matte black to pastel plastics.
Choosing the right hooks
– Materials matter. Stainless steel and brass resist humidity better than cheap plastic. Silicone options stay flexible and rust-free.
– Finishes count. Pick a finish that matches your faucet and hardware for a cohesive look.
– Weight limits matter. Use hooks for light items like loofahs, washcloths, and small pouches. Skip heavy bottles.
Where to place them
– On a towel rod or the edge of a shower rod for easy reach.
– On tiled walls with strong adhesive hooks or removable suction hooks for renters.
– Inside the shower door frame if you have one. It’s often the calmest spot and keeps items visible.
Quick-start setup
– Clean the surface well. A dry, clean spot helps hooks grip longer.
– Measure and mark. Space hooks evenly so items don’t crowd each other.
– Install and test. Press into place or screw in gently. Hang items and give a light tug to check weight.
– Tidy any drips. Wipe away water to prevent rust on metal hooks.
Smart organization ideas
– Create zones. Put body care items in one area, beauty products in another, towels and cloths in a separate section.
– Use small breathable pouches. Place razors, combs, and tiny bottles inside. Mesh bags work great here.
– Color code. Use color to identify items at a glance. For example, blue pouches for body wash, white for skincare.
– Dry between uses. Let items dry after showering to prevent mold and odors.
Care tips to keep hooks lasting
– Dry hooks after use to slow rust or corrosion.
– Replace worn or loose hooks right away. A loose hook can slip and spill items.
– Avoid overloading. If you notice sagging, move some weight to another hook or switch to a stronger option.
Common questions
– Will hooks damage tiles? Use lightweight items and proper anchors. Avoid forcing hooks into grout or delicate surfaces.
– How many hooks do I need? Start with 4 to 6 for most showers. Add more if you have long walls or lots of items.
– Can I remove them easily later? Yes. Choose removable adhesive hooks for renters, and clean the area before removing.
This simple strategy makes your shower feel bigger and your routine easier. With the right shower hooks, you gain real storage without sacrificing style.
23. Use Shower Hooks for Extra Storage
Editor’s Choice

Amazer Shower Curtain Hooks, Decorative Rust Proof Stainless Steel Showe…

Command Small Clear Wire Toggle Hooks, 10 Wall Hooks and 12 Command Stri…

24pcs Mesh Zipper Pouch Bags – 8 Sizes Plastic Zipper Pouches for Organi…
24. Seasonal Storage

If your bathroom feels crowded, seasonal storage can be a lifesaver. You don’t need to cram more into the space you have. You just need to move what you don’t use right now out of sight. With the right bins, swapping items as the seasons change becomes quick and easy.
Why seasonal storage helps:
– It frees space for the things you reach for every day, like soap, toothpaste, and daily towels.
– It keeps the room looking clean and uncluttered, so you feel calmer when you walk in.
– It makes it simple to swap in off-season items without digging through piles.
Getting started is simple. Here are five practical steps you can follow this weekend.
– Step 1: Do a quick inventory. Separate what you use year-round from what you only reach for during certain months or holidays. Put the rest in a pile for seasonal storage.
– Step 2: Decide which seasons you’ll store by. Common choices are winter, spring, summer, and holiday decor. Pick a system that matches how you actually use your bathroom all year.
– Step 3: Choose the right containers. Opt for clear or semi-clear bins so you can see what’s inside. Use stackable versions with tight lids to keep moisture out. Consider fabric bins with lids for a softer look, but make sure they’re sturdy.
– Step 4: Pack by season and label clearly. Put all towels, decor, or bulk items for one season into a bin. Use waterproof labels or tape to mark the season and contents. Put heavier items on the bottom and lighter ones on top.
– Step 5: Find a dry, accessible spot for storage. A high shelf in a linen closet, a garage cabinet, or a tall pantry works well. If your bathroom stays damp, avoid putting boxes directly on the floor. Keep a small daily-use bin in the bathroom for moment-to-moment items, so you don’t have to open the seasonal stash every day.
Smart tips to keep the system working
– Use clear bins so you can spot items fast. If you must hide color, use color-coded lids or labels.
– Protect textiles by folding neatly and using vacuum-sealed bags for bulky towels or blankets. Don’t store damp items.
– Keep a short, rotating list. Each season, swap in the next batch and remove anything you no longer need.
– Add a slim over-the-door organizer for things you reach for weekly, like floss, razors, and spare soaps.
What you gain from seasonal storage is real. Your sink area stops dripping with clutter. Your counter stays calm and clean. When the weather shifts, you can rotate items in minutes without chaos. Give it a try this weekend, and you’ll feel the difference every morning as you get ready.
24. Seasonal Storage
Editor’s Choice
Sterilite 4-Pack Ultra Latching Box, Storage Bins with Lids, Clear Plast…

20 Pack Vacuum Storage Bags, Space Saver Bags (4 Jumbo/4 Large/4 Medium/…

1 Pack Over The Door Organizer, Hanging Storage Organizer with Clear Win…
25. Invest in Multipurpose Furniture

In a small bathroom, every inch matters. You need space for basics and a calm look. Multipurpose furniture makes this possible. A bench that hides things. A cabinet that also serves as a seat. These pieces add storage without crowding the room.
Benefits
– Flexible in tight spaces.
– Makes the most of your square footage.
– Two jobs in one piece save clutter and keep the floor clear.
Practical examples
– Storage bench at the end of the tub or by the vanity. Lift the lid to stash towels, washcloths, or cleaners. It doubles as a seat when you need to reach a high shelf.
– Wall-hung cabinet with a cushioned top. Sit on it while you dry hands or apply lotion. The seat feels soft; the cabinet stays neat underneath.
– Compact vanity with built-in drawers and a hidden compartment. It hides brushes, toothpaste, and small bottles. Some models add a recessed shelf to keep items in reach.
– Folding stool that tucks behind a vanity or door. Use it for shaving, applying makeup, or drying hands. Slide it away when not needed.
Materials and styles to consider
– Moisture-resistant finishes like vinyl, sealed wood, or coated MDF. They last in humid baths.
– Soft-close hinges on drawers cut noise and wear.
– Neutral colors mix with most tiles. Or pick a bold piece to stand out.
How to choose the right piece
– Measure your space first. Note door swings and light.
– Check weight limits. You’ll sit or lean on it, so make sure it can handle daily use.
– Think about your daily routine. If you shower first, place towels where you can reach them.
Placement ideas
– Put a bench where you stand most for dressing or drying off.
– Mount a cabinet above the sink to free floor space.
– Use a corner shelf with a seat for a tight corner.
– Keep the floor clear so the room feels bigger.
Maintenance tips
– Wipe surfaces daily to avoid soap scum.
– Tighten screws every few months.
– Clean fabric cushions as directed.
With multipurpose furniture, you get style and function in one piece. You save space and still have what you need close at hand. It helps a small bathroom feel calm and organized.
25. Invest in Multipurpose Furniture
Editor’s Choice

DUMOS 30in Foldable Storage Ottoman Bench, Storage Chest, End of Bed Foo…

Haotian Wall Cabinet Laundry Room, Medicine Cabinet for Bathroom Kitchen…

Folding Stool – Backless 24-Inch Stool with 225lb Capacity for Kitchen o…
Conclusion

Maximizing space in a small bathroom doesn’t have to be a daunting task! With these 25 organization hacks, you’re well-equipped to turn your cluttered sanctuary into a beautifully organized retreat. From clever storage solutions to creative decor ideas, every square inch can contribute to a serene atmosphere.
Get inspired and tackle your bathroom organization today!
Note: We aim to provide accurate product links, but some may occasionally expire or become unavailable. If this happens, please search directly on Amazon for the product or a suitable alternative.
This post contains Amazon affiliate links, meaning I may earn a small commission if you purchase through my links, at no extra cost to you.
Frequently Asked Questions
What Are Some Simple Storage Solutions for Small Bathrooms?
If you’re looking for effective storage solutions in your small bathroom, consider going vertical with shelves or using the inside of cabinet doors for extra space. You can also utilize clear storage containers to easily see and access your items, or try decorative baskets that combine style with functionality. These hacks will help keep your bathroom organized and clutter-free!
How Can I Maximize Space in My Tiny Bathroom?
Maximizing space in a tiny bathroom can be achieved through space-saving tips like using a rolling cart for mobile storage or hanging organizers for small items. Don’t forget to utilize above-the-toilet space with slim shelves or cabinets. Each inch counts, so think creatively about how you can use vertical and hidden spaces to your advantage!
What Are the Benefits of Using Clear Storage Containers in a Small Bathroom?
Clear storage containers offer a great way to organize your bathroom without adding visual clutter. They make it easy to see what’s inside, which speeds up your morning routine. Plus, they can be stacked neatly in cabinets or on shelves, making the most of your available space. Say goodbye to chaotic drawers and hello to streamlined organization!
How Do I Create a Cleaning Supply Station in My Bathroom?
Creating a cleaning supply station is simple and effective for managing clutter! Dedicate a specific area, like a cabinet or a shelf, for all your cleaning supplies. Use small bins or caddies to keep items grouped together, making it easy to grab what you need without rummaging through other items. This not only saves time but also keeps everything tidy and accessible!
Can Seasonal Storage Help Reduce Clutter in a Small Bathroom?
Absolutely! Seasonal storage is a fantastic way to reduce clutter in a small bathroom. By moving out items you don’t frequently use, like heavy towels or seasonal decor, you can free up valuable space. Consider storing these items in bins or under the sink to keep your bathroom feeling spacious and organized year-round!
Related Topics
small bathroom organization
space-saving tips
storage solutions
vertical shelving
decorative storage
easy hacks
compact design
beginner friendly
bathroom decor
minimalist organization
quick tips
functional furniture
Leave a Reply